 |
| Making Your Home A Haven 31 Day Fall Challenge
When I saw this challenge, it reminded me that I haven't read my book Making Your Home A Haven by Cyndy Salzmann in quite a while. I used to read it at least once a year and I always give it as a gift to new brides. It's one of my all time favorite books for the homemaker. I highly recommend reading it even if you think you have it all together. I'm going to be doing the 31 day challenge with WomenLivingWell.org as well as re-reading this wonderful book. Please join me in this challenge and pick up a copy of Cyndy Salzmann's awesome book!!
|
Tuesday, November 6, 2012
Making Your Home A Haven
Tuesday, October 2, 2012
Meme's Little Helper
My little granddaughter Ava spent this past weekend with us so I let her help me in the kitchen while I was rolling out the dumpling for our chicken and dumpling dinner. She'll be 2 years old in December and for one so young, she has a very good attention span and didn't get bored with it at all. I can hardly wait to make Christmas cookies with her this year!! What a little doll!!


I also sat down with her and gave her a little sewing lesson. I just punched some holes in cardstock, got a big fat blunt needle, threaded it with yarn and showed her how to go in and out of the holes. She loved it and was surprisingly very precise about it.


I remember when I was little I used to have some sewing cards that outlined a picture and you would sew around the outline. I googled it and sure enough I found some cute Learn to Sew Classic Retro Lace up Cards on Amazon that will be under the Christmas tree this year.


Thursday, September 27, 2012
Anticipating Autumn

Although it's officially fall, here in Texas it is still a bit on the warm side with today's high being 93 degrees. The weather channel promises cooler temperatures for this weekend and early into next week in which I am very thankful.
There's just something about this time of year that gives me a warm fuzzy feeling. Although I'm extremely busy right now planning my daughter's wedding, I am anxious to pull out all my fall decorations and start getting the house and front porch ready for the season. My husband has all the hay for the winter stacked neatly in the barn but I'll have to swipe a few bails to decorate the porch.
I've been perusing pinterest for fresh ideas on fall decor and also some recipes I'd like to try. Here's what I found.


I'm really loving the banner idea a lot!!


I love certain elements of each of these and not real sure exactly how I want to decorate my mantle yet but I'll be working on it this week and hopefully have pictures up pretty soon.
I also found a few recipes that I'd love to try
 |
| Brown Butter Pumpkin Cake with Honey-Cinnamon Frosting |
 |
| Pumpkin Whoopie Pies |


There's lots more where these came from, check out my pinterest board here!!

Thursday, August 30, 2012
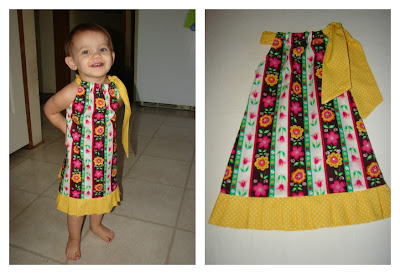
Pillowcase Dresses Completed
Originally I was just going to let the hem out of these dresses and put a smaller hem in them, but I decided to add a ruffle or extension and added some embelishments and a tie. They turned out really adorable!! I was also able to finish the two other pillowcase dresses as well. That's three unfinished projects down and ........ a few more to go!!


Wednesday, August 29, 2012
Dresden Quilt Top Finished

So glad to finally have the border on my Dresden Plate Quilt. The corners were a bit tricky but I managed to get it to look like what I wanted it to. Now it is folded and stacked with the other "to be quilted" quilts which I hope to get done this winter. I'm planning on using this quilt for a room I'm going to fix up for my precious granddaughters, but first we have to get my daughter married and out of the room. I'll be sure to post before and after pictures because it will be a HUGE differnce. The room now is painted a dark grey with black trim (you know teenagers) . I plan on turning it into a vintage toy room with two twin size iron beds and my Dresden quilt will be the color pallet. I can hardly wait to start collecting vintage toys and other items to fill the room.
Tuesday, August 28, 2012
Projects Need Finishing
I have so many projects that need finishing and I'm determined to get them done before I start any new ones.....well I may start new ones but in the meantime I will be working steadily on the old ones and try to have them done by the end of the year.....I hope. I currently have on loan my friends sewing machine because mine needs to go in the shop. She let me know that she will be needing it back soon so I need to get on the ball and get as much done this week as I possibly can. Here's what I'm working on.


Eight pillowcase dresses that I made for my granddaughter that are too short. I have to take the hem out and either add some coordinating fabric to the length or add a ruffle.

Two pillowcase dresses needing to be made.

The border needs to be added to my Dresden Plate quilt.

Three other quilts waiting to be finished.....long term projects.

Five quilts (besides the Dresden) waiting to be quilted. Some of these I will quilt by hand and others will be taken to a shop for machine quilting.

A cross-stitch project I have been working on (or not working on so much) for several years. I seriously need to finish it this year, no more excuses.

I bought this basket full of crochet motifs at an estate sale years ago. My mother-in-law was going to put them together for me for a tablecloth but she passed away suddenly almost six years ago. When I found them in her craft closet, she had put together about twenty of them. I have had them for a long time now and haven't added to that number at all. I would love to get this finished sometime soon.

And finally the most recent project started is this crochet afgan. The motifs are easy to do a square at a time while I'm sitting in the reclyner in the evening after dinner. I could probably easily crochet five a night if I set my mind to it and could have this done in no time. I had two shade of pink yarn as well but ended up using it in a small afgan I made for my new little granddaughter so I will need to replace it.
It looks like I have my work cut out for me and will be quite busy for a good long while. I would love to have all these projects and more done by the years end, but my youngest daughter is getting married in October so I will be very busy planning and preparing for that. I will just have to do the best I can. Even though I have a long list of unfinished projects I do have an equally long list of finished ones (so you see, I'm not a total procrastinator). I'll share with you the finished projects very soon but for now, it's off to work I go. Have a blessed day!!
Friday, August 24, 2012
Sweet New Baby Girl to Love

Our beautiful new little granddaughter, Zoey Elowynn Carter was born June 6, 2012 at 10:04 pm weighing 7lbs 13 ozs and 20 inches long. She is such a precious addition to our family and her big sister Ava adores her. I made the sweet little quilt she is sleeping on. It is a trip around the world pattern and I found the vintage style fabric at JoAnns. It was finished just in time to be used as a prop in these adorable newborn portraits. In the photo below, Zoey is snuggled up in a crochet cocoon that I made for her using a pattern purchased from an Etsy pattern shop that is no longer available; however there are many other patterns available out there for a precious cocoon just like this one. Check out the following links for similar patterns.
Baby Cocoon Patterns at Etsy
E-Patterns Central
Baby Buntings, Cocoons and Sleep Sacks

I love these two little girls with all my heart and consider myself a truly blessed Meme!!
Thursday, August 9, 2012
Canning Beets Part 2
Sorry it has taken so long to post part 2 of the beet pickling process. My daughter had her sweet baby girl not long after the posting of part 1 and I just now have the time to sit down and get it typed up. I'll be writing a post about our sweet new granddaughter (who is already 2 months old) very soon. In the meantime, Pickled Beets: Part 2
Here's what you'll need. Pickling salt, Vinegar (labeled 5% acidity), Cinnamon Sticks, Whole Cloves, sugar (sorry, not pictured), Onions (optional) and of course, your beets that have been prepared (see part 1).


Here's what you'll need. Pickling salt, Vinegar (labeled 5% acidity), Cinnamon Sticks, Whole Cloves, sugar (sorry, not pictured), Onions (optional) and of course, your beets that have been prepared (see part 1).

I use the recipe from the Kerr Kitchen Cookbook . My mother-in-law gave me this cookbook years ago and has many great recipes.
You will need 6-7 pounds of sliced beets per batch. The complete recipes is as follows:
PICKLED BEETS
6-7 pounds beets
water
4 cups cider vinegar (labeled 5% acidity)
2 cups sugar
2 cups water
1 1/2 teaspoon pickling salt
2 (2-inch) cinnamon sticks
1/2 teaspoon whole cloves
1 medium onion, sliced (optional)
Wash beets. Trim tops leaving 3 inches of tops and roots. Place beets in an 8-10 quart saucepan and cover with water. Cover and cook beets over medium-high heat until skins slip off easily, 20-30 minutes. Drain and discard water. Trim off tops and roots. Slip off skins. Slice beets 1/4 inch thick. Tie spices in spice bag or cheesecloth. In a 4 to 6 quart saucepan, combine vinegar, sugar, water, pickling salt and spice bag. Bring to boil over medium-high heat. Add beets and onions. Cook 5 minutes. Remove spices. Immediately fill hot pint jars with beets leaving 1/2 inch head-space. (Instructions for preparing your jars and lids) . Pour hot vinegar mixture into jars, leaving 1/2 inch head-space. Carefully run a non-metallic utensil down inside of jars to remove trapped air bubbles. Wipe jar tops and threads clean. Place hot lids on jars and screw bands on firmly. Process in boiling water canner for 30 minutes. Yield: 7 pints. (Water Bath Canning Tutorial)
Few things we can do in this world are so well worth doing as the making of a beautiful and happy home. He who does this builds a sanctuary for God and opens a fountain of blessing for men.
Far more than we know, do the strength and beauty of our lives depend upon the home in which we dwell. He who goes forth in the morning from a happy, loving, prayerful home, into the world’s strife, temptation, struggle, and duty, is strong--inspired for noble and victorious living. The children who are brought up in a true home go out trained and equipped for life’s battles and tasks, carrying in their hearts a secret of strength which will make them brave and loyal to God, and will keep them pure in the world’s severest temptations.
J.R. Miller, Home-Making
Tuesday, June 5, 2012
Canning Beets Part 1
Canning season is in full swing and I've been as busy as a bee trying to get things done before my daughter goes into labor. We picked all our beets and I finally have them canned and put in the pantry. I'm not a big fan of pickled beets (or any beets for that matter), but my husband absolutely loves them. It's a bit of a long process but not difficult at all. Make sure when you pick them not to cut the stem too close to the beet and don't cut off the root. Keep about a 2-3 inch stem. If you cut too close all the pretty red color will run leaving the beets a bit pale in color.


Wash the beets really well and place in large stockpot; cover with water.

Cover and cook on medium high heat for about 20-30 minutes or until skins slip off easily. Mine took right at 30 minutes. Drain and discard the water and let the beets cool down. I just put mine in my sink and ran some cool water over them. Trim off the stem and the root and the skins should just slide right off.

You are now ready to slice or dice the beets, whichever you prefer. I bought a mandolin from Pampered Chef a while back so I used that to slice them. Last time I just used a simple paring knife which worked well too.


Beets are slightly messy to work with so be sure to use an apron so you don't mess up your good clothes. From here you can either put a lid on them and put them in the fridge (which is what I did because I was flat worn out) OR you can proceed to the canning process (Part 2) . If you would like to purchase a mandolin like the one I have here, listed below are a couple of links you can check out. Have a blessed day!!
Pampered Chef Ultimate Mandolin from Amazon
Thursday, May 24, 2012
I absolutely love this time of year when the things in my garden are ready to harvest. We have been getting lots of squash, zucchini, potatoes and plenty of greens.


INGREDIENTS:
Melt remaining 2 Tbsp. butter and stir with remaining 1 1/2 cups breadcrumbs, 3/4 cup Parmesan cheese, and garlic salt. Sprinkle mixture evenly over the top of the casserole. (If you want, sprinkle another 1/2 cup of Cheddar cheese on the top to make it extra cheesy.) Bake at 350 degrees for 35-40 minutes, or until set. Makes about 8-10 servings.

With squash in abundance most of the summer I try to find different ways to prepare it. I tried a new recipe last night from one of my boards on pinterest and my husband loved it.
First thing you'll need to do of course is wash your squash thoroughly, then cut of the ends and slice. Place the slices into a large pot and cover with water.
Cook for 8 to 10 minutes or until just tender. Drain well and remove squash from pan. Place between layers of paper towels and pat dry then set aside.

In large skillet, melt 2 tablespoons of butter. Saute a medium chopped onion and 2 minced garlic cloves until tender (about 5 to 6 minutes). Remove skillet from heat. In a large mixing bowl, combine the squash, onions and garlic. Add 1 cup of bread crumbs, 3/4 cup parmesan cheese, 2 cups grated cheddar cheese, 1/2 cup freshly chopped green onions, 1/2 cup fresh chopped parsley, 1 cup sour cream, 1 tsp each of salt and pepper and 2 large eggs lightly beaten. Gently stir to combine then pour into lightly greased 13x9 inch baking dish.
In a separate bowl, combine 2 tablespoons of melted butter, 1 1/2 cups bread crumbs, 3/4 cup Parmesan cheese and 1/4 teaspoon of garlic salt. Mix well then sprinkle evenly over top of casserole. Bake at 350 degrees for 30-40 minutes or until set.
For a little extra cheesy goodness, top the casserole with more shredded cheddar cheese....which is what I did!!!

- 4 pounds yellow squash, sliced
- 4 Tbsp. butter, divided
- 1 large sweet onion, finely chopped
- 2 garlic cloves, minced
- 2 1/2 cups soft breadcrumbs, divided
- 1 1/2 cups shredded Parmesan cheese, divided
- 2 cups (8 oz.) shredded Cheddar cheese
- 1/2 cup chopped fresh chives
- 1/2 cup minced fresh parsley
- 1 cup sour cream
- 1 tsp. salt
- 1 tsp. pepper
- 2 large eggs, lightly beaten
- 1/4 tsp. garlic salt
Melt remaining 2 Tbsp. butter and stir with remaining 1 1/2 cups breadcrumbs, 3/4 cup Parmesan cheese, and garlic salt. Sprinkle mixture evenly over the top of the casserole. (If you want, sprinkle another 1/2 cup of Cheddar cheese on the top to make it extra cheesy.) Bake at 350 degrees for 35-40 minutes, or until set. Makes about 8-10 servings.
Subscribe to:
Posts (Atom)